Saturday, December 19, 2020

Smart Home by Raspberry Pi : 5 Steps with Pictures

They started a crowdfunding project on CrowdSupply if you want to help them. If you don’t know, a Samsung DeX Station is a way to turn your Samsung smartphone into a desktop computer, with all the ports you need . The goal is to use your skills to build an old school phone with a Raspberry Pi Zero. The goal of this project is to build a cheaper drone, with smart abilities. It’s not the official one, it’s smaller, but is exactly the size you need for this project. You can even use the stylus to turn your classic-looking console into a modern device .

So far, I've looked for a solution to get this up and running on Android too, but I've not come to any working solution. Overall, there are loads of Raspberry Pi smart home project ideas for Raspberry Pi smart home automation, control, and more. Home Assistant is easily one of the best options with its extensive documentation and pre-made image for the Raspberry Pi. LinuxMCE has been around a while and remains a worthy contender, particularly for combining home theatre PC applications with smart home control.

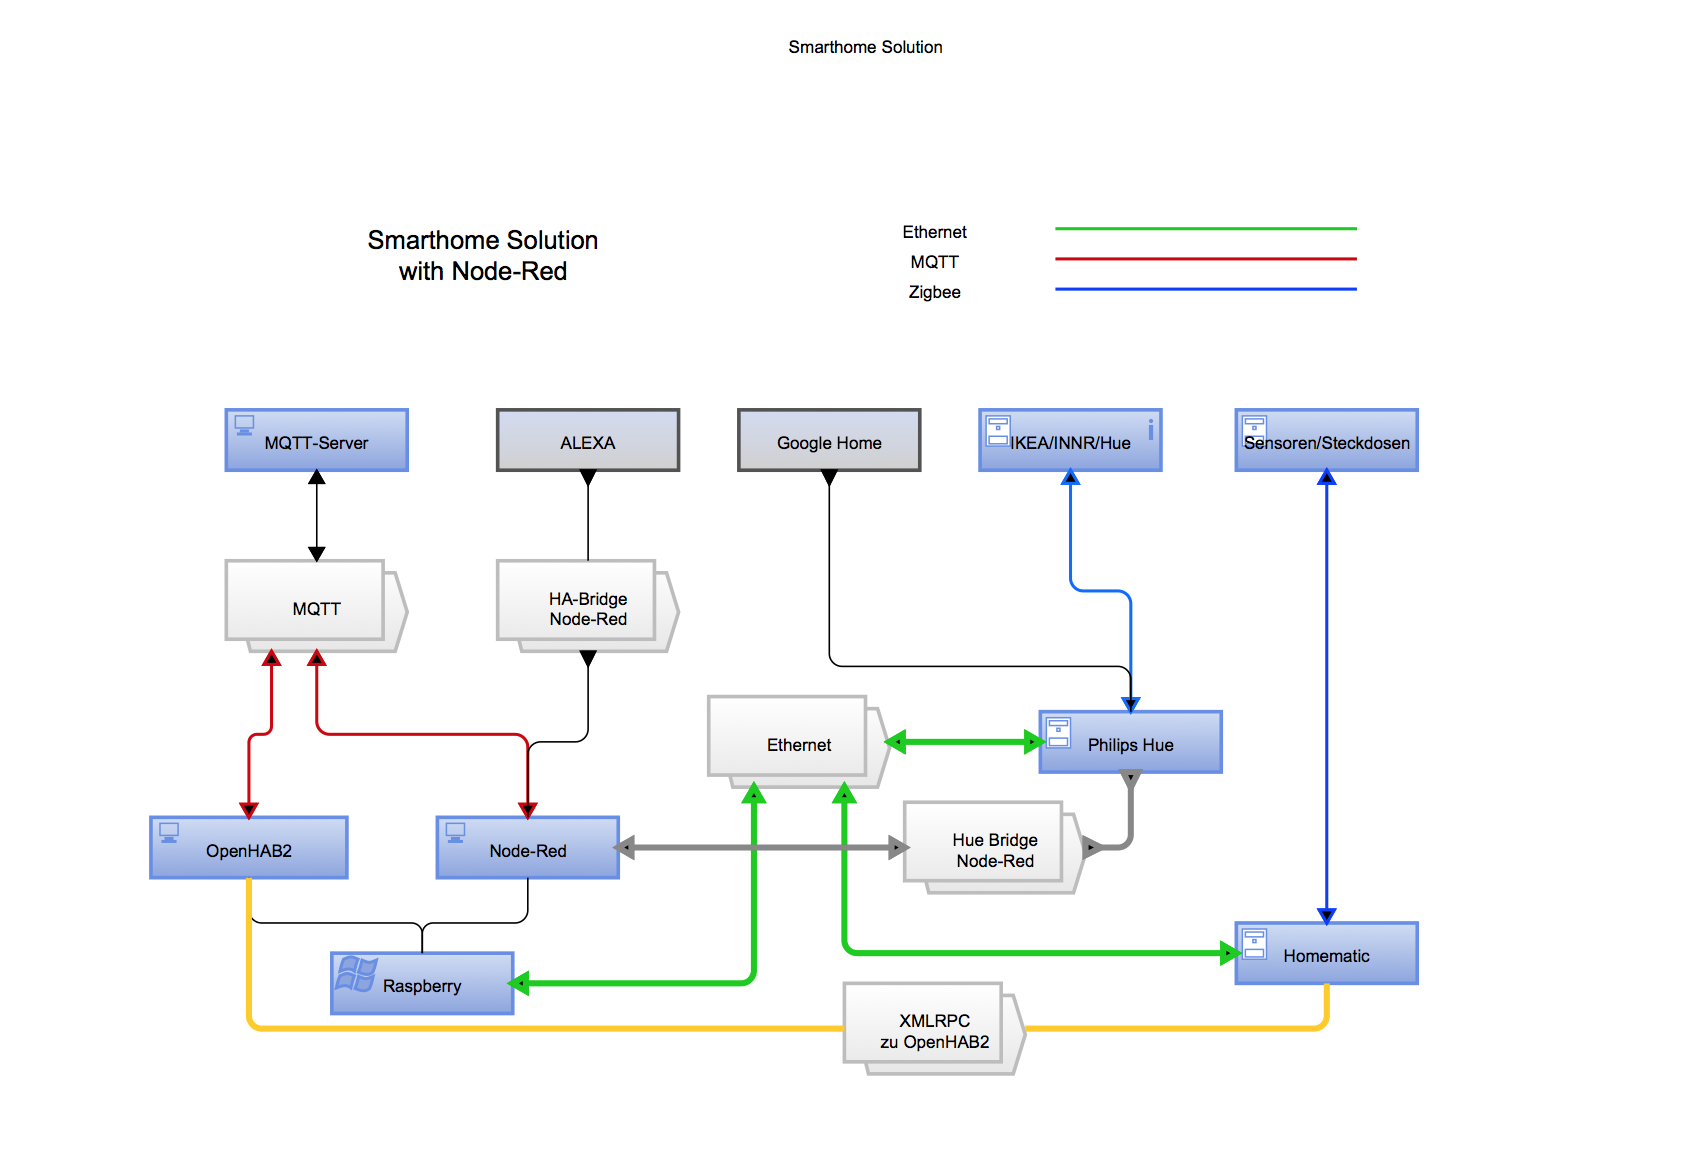
How to: Create a Z-Wave Smart Home hub using a Raspberry Pi

Ok, the guy who shared this project has made funny pictures, but he also had good ideas. I saw a lot of project on garage door openings during my research to create this list. It’s a project that is not easy to implement, but it must be nice to complete. But there are many components to buy, which you’ll then need to connect and assemble properly.

raspberry pi zero smart home

And you gain quality with the color screen (the original had a bad white and black screen if you don’t remember). The first project idea is to push retro gaming to the maximum while using old controllers directly. The 'send' executable allows you to send codes to switch most of the available power supplies. Then we need a library that implements typically rc power supply protocols. Electromaker kits Fun, educational DIY electronic kits and video tutorials for all abilities. Projects Browse 1000’s of projects and gain inspiration for your next venture.

Step 2: Complete Setup

In the link below, I will explain how to control them from the Raspberry Pi. And you have probably already understood the purpose of this project. It’s the concept Kodi, an open-source home theater software that you can easily use on Raspberry Pi OS, OSMC or LibreElec.

The release of the Raspberry Pi Zero has completely amazed the tech community. With the price, form factor, and being high on utility—the Raspberry Pi Zero is the perfect companion to support home automation projects and makes IoT even more accessible. If you want Homebridge to run all the time, you’ll probably want to configure it to restart if it crashes or if your Raspberry Pi restarts. Set this up after you’ve verified Homebridge is working as intended. It has a fairly large community backing, so there’s a good chance any given smart device probably has a Homebridge plug-in to add support for it.

HomeKit for Any Smart Device

Homebridge is a NodeJS app, so you have to installnodeand npmto use it. If your machine runs Linux, you can probably get it from your package manager. I used to work for an industrial oven manufacturer and the way you described expanding your temperature tolerances so your valves weren't clicking on and off reminded me of it. At the ds18b20 the VCC/Ground are connected, while its Data pin goes to the connected VCC/Data pins at the Pi.

raspberry pi zero smart home

2) After Raspbian Stretch was released, I tried to set up homebridge on a fresh install several times but it failed each time . It seems as though this is quite common as a lot of other homebridge users have complained about the same issues with Raspbian Stretch. But this image is already fully set up and I can confirm it works. At the time of publishing the instructable, I did not create a Github repo for this project. I did try to create a Github repo for this some months ago, but the installation would no longer work , so I left it. Python is preinstalled on Raspberry Pi OS, allowing us to build a lot of awesome projects with the Raspberry Pi.

To keep things simple, all programs are set to run automatically on the Pi Zero W as soon as power is supplied. My aim was to make a WiFi-controlled smart light that would be cheaper than most smart lights, yet have full functionality . To make the Light more user-friendly and easy to set up, I've thought about a way to connect and control the light without having to open a website or downloading any app. A comprehensive smart home automation OS, Calaos offers a staggering amount of support. There’s touchscreen interface compatibility, native Android and iOS apps, a Linux OS foundation, web app, and even server functionality.

raspberry pi zero smart home

With this Raspberry Pi hack, though, you can add HomeKit support to any smart device with the open-source Homebridge software. With the software and general hardware design in place, I started figuring out how to package all of the components in a more permanent and polished form. One of my main concerns for a permanent installation was to use a breadboard with DuPont jumper wires. I ordered some solderable breadboards and a screw terminal breakout board (thanks @arduima for the Raspberry Pi GPIO pins). However, deciding on the application architecture and framework was a confusing, multi-day process.

After a few seconds the LED ring will start pulsing blue again – install additional devices or press the action button once to leave inclusion mode. Then you can control the box from your browser or your smartphone; you don’t need any keyboard or remote control. Congratulations, you now have a fully configured Raspberry Pi Zero! In the next chapter, we are going to build your first application using the Zero board and learn how to measure data from sensors. Now, once you have Raspbian installed on your SD card, insert it into Raspberry Pi and connect the Raspberry Pi board to the power source via the micro-USB port. Of course, you will need other components to use the Raspberry Pi Zero board that I haven't included here as usually, they are already on everyone's desk.

I started out evaluating open source projects like PiHome, but it relied on specific hardware and was written in PHP. I'm a Python fan and decided to start from scratch and write my own REST API. Do I really need to buy a Raspberry Pi Zero to build these projects? And I don’t encourage you to buy a Pi Zero if you already have another one. Choose the project that interests you, try it with your current model, and if the result doesn’t satisfy you, only then consider buying a zero.

But maybe it can be useful with a low budget or to use as a controller for a bigger project. You will need to assemble a few parts to build it and then you will have a complete computer that fits in your hand. For example, you can use an old smartphone, a photo frame, or a dedicated kit . You don’t necessarily need to take a Raspberry Pi Zero for this project, any Raspberry Pi will do the job. As he says in the video, the image is not top quality, but it should be correct anyway (resolution is limited to 640×320 if I remember well). The idea was to live monitor the bees in their home, check various sensors, and try to find other reasons for their extinction.

raspberry pi zero smart home

Run the installer and follow the instructions on the screen to install the program. The part of notifications on your smartphone was made using Pushover APIs. This allows you to send real-time notifications to the Pushover account connected both with PiDoorBell both with the receiving smartphone.

Required components for the Zero board

A Z-Wave slave node can sometimes have problems joining a new Z-Wave network if its already part of an old network. Once logged it lets connect the Raspberry Pi to a WiFi network and the internet. And here we are at the end of my list of favorite projects for home. The poolers offer more and more this kind of services when installing a new swimming pool.

Friday, December 18, 2020

How to Remove Facial Hair: 8 Methods That Work

Using the point technique, you can start trimming the hair. This will help you cut into the hair, not across it, ensuring that the line is well-textured and forgiving. Then, those confident with the scissors can trim across to achieve a solid, blunt look. However, you only have to cut the ends, not just anywhere. An advantage of cutting hair with a razor is that your locks will be so soft and touchable!

You can always go back and remove more hair, so work slowly to achieve the desired effect. This is only necessary if you are trimming an undercut or a pixie that is shorter on the sides/back and longer on top. Use the handle of a rat-tail comb to separate the long hair from the short hair.

The Adorable Barefoot Dreams x Disney Collection Is on Sale at This Unexpected Place & Deals Start at Just $18

There must also be a spray water bottle to dampen the hair as required and a cape to ensure that the hair does not land up in your clothes. With so many bob styles with razored ends to choose from, there’s an option out there for every face shape. Show off your facial features with a short and sweet layered fringe, and style it somewhat messy for a nonchalant flair. While we #StayHome, I wanted to offer some tips and show you guys how I’m to maintain a smooth head shave with the @Gillette SkinGuard. Work slowly in the direction of your hair growth and keep a steady pace to avoid making mistakes, tugging on your hair, or hitting your scalp.

how to razor hair at home

You don’t have to prepare your skin when using an epilator. However, exfoliating a couple of days before helps soften the skin and reduce the risk of ingrown hairs. Keep in mind that while this method is relatively safe, ingrown hairs can be a side effect of shaving. These small bumps develop when hair grows back into the skin. Ingrown hairs usually improve on their own within days. Rock salt can be an excellent ingredient to sharpen your clipper blades.

Step 2 – Clean the blades

If you wish for them to last you long and retain their efficiency, you must know how to sharpen hair clipper blades. This may be more than just a style risk as, at times, cutting your own hair can also damage it. – If you have curly or waxy hair, you can start the cut with the dry texture only. This will give you better clarity on what the final look will be. On the other hand, people with straight hair should cut when the hair is damp.

how to razor hair at home

Gillette’s FlexBall technology allows the blades to pivot over the contours of your scalp with ease. Slowly run the clippers in the opposite direction of your hair growth and let the clipper guard feed hair into the blades with each new stroke. In laser removal, a doctor or dermatologist uses a laser device on your bare skin that sends concentrated light down to the hair follicles. Heat from the laser weakens or destroys the hair follicles, keeping the hair from growing back. But it’s definitely something that many people across the sexual, age, culture, and gender spectrums — male, female, and others — have pursued.

How to trim your split ends on dry hair

This way you can see how much hair you are removing and if it is too much or too little. Depilatory creams are another option for facial hair removal. The results can last longer than shaving and these creams may be cheaper than waxing. Tweezing is another effective and inexpensive way to remove facial hair. This method works slightly differently than shaving.

how to razor hair at home

To get the blades out, you have to unscrew these screws. Once unscrewed, you can get your blades out. However, the edges are stuck inside and do not come out sometimes. So, you can use a tweezer and pull them out. How to sharpen clipper blades with these mere your supplies – you wonder! Well, fetch the screwdriver, and unscrew the clipper blades at first.

Be ready to make pubic hair removal a routine if you want to keep it up. This haircut tutorial was pretty much made for you. Follow along as YouTuber Vivi König very carefully gives her bangs some TLC. She recommends styling your hair prior to your trim—that way you have a better idea of the true length you’re working with. But if you’re already about to scroll past my warnings and disclaimers and just do the dang thing yourself, then fine, I get it, and I’ve been there. Instead of blunt ends, the razor cut leaves you with an angled finish.

This guide will teach you everything you need to know on how to cut your own hair at home. Let us get started and address these tips one by one. Of course, we know and understand that it is not ideal for anyone to cut their hair at home.

How to Thin Your Hair With a Razor at Home

You need to get a razor comb that has long teeth on one edge, and short teeth on the other. This will give you better control of how much hair you cut off. The comb can have straight teeth or curved/concave teeth. Do not start the razor at the roots of your hair. Always start at least two to three inches away from the root.

However, the honest fact of the matter is desperate times call for desperate measures. Waxing can be painful but very effective at removing hair for a long period of time by ripping large areas of hair out by the roots. It can also reduce itching as hairs grow back. Unless the hair loss is caused by an underlying medical condition, hair always grow back, even with some of the most aggressive medical treatments.

– Of course, you have seen many ‘how to trim your own hair’ YouTube videos and tutorials, but you are still an amateur at it. Section your hair to avoid any major faux pas. To section, you can use hair ties or sectioning clips. You can cut further, but you cannot undo what’s already done. Please bear in mind when your hair is wet, it looks longer. So, once they dry after the cut, it will look even shorter.

how to razor hair at home

Trimming or carefully shaving are the best options. And to make sure you’re getting expert information, Brown says to choose one created by an actual hair expert or stylist. But if you want expert advice (and you do!), keep reading first. If your hair is fine, a razor cut may not be your best choice. It tends to make thin or fine hair look droopy - and even frizzy in the case of wavy and curly strands.

How To Sharpen Hair Clipper Blades – FAQs

Now that you know how to cut your own hair at home, we hope that you’d be able to save up on your salon visits by a lot. Next, Blend the fade into the hair on top with the help of a comb. Now, go gradually, and blend the hair by changing the guards.

how to razor hair at home

How to Trim Your Own Hair at Home in 2022, According to Experts

Hold the skin tight and shave slowly and gently in the direction that your hairs grow. Choose a natural cream, moisturizer, or gel to lubricate the skin and reduce the chance of irritation or breakouts. Shaving is one of the easiest ways to get rid of hair since you just need a clean razor and some cream or gel. There’s plenty you can try at home to shape or shave your pubic hair, but remember that none of them are permanent. After I did the whole bottom layer, I moved on to my top layer. I pretty much did the same as my bottom layer, took a small section and ran the razor over it starting 3/4 of the way down.

Then, on Dec. 19, Kylie posed in front of a different tree in a slideshow she deemed as her “Christmas card” with BFF Stassie Karanikolaou. The pair smiled and laughed in front of a much more average size tree at Sunny vodka’s 2022 holiday party in the gorgeous snapshots. Kylie wore a sexy black latex gown with one strap, while Stassie, also 25, slayed in a skin-tight legging and crop top combo that was covered in red lace.

How To Cut Your Own Hair with Clippers

To reduce pain, ask your technician to apply numbing cream to your face, or apply a warm compress afterward. This method of hair removal requires skill, so you’ll need to find a trained cosmetologist or esthetician. For the best results, clean your face and apply a layer of soap or shaving cream. This promotes a smooth surface and reduces the likelihood of cuts.

how to razor hair at home

To start, you’ll need some powered clippers. Once you have clippers and are familiar with the settings, choose your desired style . With a little prep and practice, you’ll master at-home hair cuts in no time. Cuts and burns are among the common injuries suffered by people who groom or remove their pubic hair.

#20: Razor Cut Long Hair with Balayage

You need to get a razor comb that has long teeth on one edge, and short teeth on the other. This will give you better control of how much hair you cut off. The comb can have straight teeth or curved/concave teeth. Do not start the razor at the roots of your hair. Always start at least two to three inches away from the root.

Once you have cut all of your hair, brush through your hair one final time to remove any loose hair. Even if you shave, wax, tweeze, or thread, unwanted facial hair eventually grows back. Talk to your doctor to see if this prescription is right for you.

How to Remove Pubic Hair Safely at Home and with a Professional

You need to invest in a fresh pair of scissors, exclusively meant for your hair. The regular kitchen scissors can give you further split ends. Now, repeat the same on the right and left sections to match the back length. If the hair is thin, you can do it all in one go. On the contrary, if the hair is thick, you should divide it into multiple sections before cutting. Comb and untangle your hair, and then divide it into three sections.

Be ready to make pubic hair removal a routine if you want to keep it up. This haircut tutorial was pretty much made for you. Follow along as YouTuber Vivi König very carefully gives her bangs some TLC. She recommends styling your hair prior to your trim—that way you have a better idea of the true length you’re working with. But if you’re already about to scroll past my warnings and disclaimers and just do the dang thing yourself, then fine, I get it, and I’ve been there. Instead of blunt ends, the razor cut leaves you with an angled finish.

Steps

However, the results aren’t permanent or long-lasting. Your face will remain hair-free for one to three days, and then you’ll have to re-shave. Take some toothpaste and apply it to the clipper’s screen segments and the razor. You can turn on the power and run the razor at a minute pace to spread it well. Step 2– Use a toothbrush to clean all the debris, residue, and hair. Now, decide the length you want to cut and make the first cut right in the middle.

how to razor hair at home

These products are available as a gel, cream, and lotion. While these creams can remove hair on any part of the body, some creams are designed specifically for facial hair. This means that they also smooth, exfoliate, and moisturize the face. Epilation is another option for removing facial hair. This technique can eliminate hair for up to four weeks, which might be a better choice if you’re busy and don’t want to regularly shave or tweeze.

Do’s & Don’ts To Consider Even If You Know How To Cut Your Own Hair

This picture is a pretty example of the feathered effect the method of blade cutting gives to mid-length hairstyles. First, hydrate your scalp and the hair you have before you shave. If the hair on your head has grown beyond a stubble length, shorten it down with a trimmer or clippers before you shave. We recommend shaving during or just after a hot shower. Choose your clipper’s guard length that matches the length you want to achieve. This treatment treats individual hair follicles, one at a time, unlike lasers which usually treat multiple hair follicles within a designated area.

If you have the proper tools and the right technique, then you can razor cut your hair at home. First divide your hair into three sections—a top, middle and bottom section. Starting with the bottom section, place the razor comb at a 45 degree angle relative to your hair.

Glide the shaver over your face in the direction of hair growth. Shaving is one of the fastest and easiest ways to remove hair and continue your day. Whether you’re using a disposable shaver or an electric shaver, both have a built-in blade that lifts and cuts hair at the skin’s surface. The process for sharpening the hair clippers is similar to sharpening with sandpaper. The only difference is instead of sandpaper, there is an aluminum foil.

Thursday, December 17, 2020

Decorative Wood Trim Molding Home Depot Home Decorating Ideas

This medium weight 2.5" (6.3cm) Bullion fringe is a traditional fringe perfect for edging curtains, cushions, throws and valances. Can be used on the base of loose covers, Pillows and upholstered furniture. This style available in a variety of colors and sizes. Search "DecoPro Bullion Fringe" to view and sort...

home depot decorative trim

This Heavy weight 9" Bullion fringe is a traditional fringe perfect for skirting Sofas & Ottomans and on the edging curtains, cushions, throws and valances. Can be used on the base of loose covers, Pillows and upholstered furniture. This style available in a variety of colors and sizes. Search "DecoPro... This full bodied 3" Bullion fringe is a traditional fringe perfect for edging curtains, cushions, throws and valances. Can be used on the base of loose covers and upholstered furniture. This style available in a variety of colors and sizes. Search "DecoPro Bullion Fringe" to view and sort additional color... This full bodied 3" Bullion fringe is a traditional fringe perfect for edging curtains, cushions, throws and valances. Can be used on the base of loose covers and upholstered furniture. This style available in a variety of colors and sizes. Search "DecoPro Bullion Fringe" to view and sort additional... This slender, yet fine, 2" Bullion fringe is a traditional fringe perfect for use on apparel, edging curtains, cushions, throws and valances. Can be used on the base of loose covers and upholstered furniture. This style available in a variety of colors and sizes. Search "DecoPro Bullion Fringe" to...

Home Depot Decorative Wood Trim Home Decorating Ideas

This Heavy weight 9" Bullion fringe is a traditional fringe perfect for skirting Sofas & Ottomans and on the edging curtains, cushions, throws and valances. Can be used on the base of loose covers, Pillows and upholstered furniture. This style available in a variety of colors and sizes. Search "DecoPro... This full bodied 3" Bullion fringe is a traditional fringe perfect for edging curtains, cushions, throws and valances. Can be used on the base of loose covers and upholstered furniture. This style available in a variety of colors and sizes. Search "DecoPro Bullion Fringe" to view and sort additional color... This full bodied 3" Bullion fringe is a traditional fringe perfect for edging curtains, cushions, throws and valances. Can be used on the base of loose covers and upholstered furniture. This style available in a variety of colors and sizes. Search "DecoPro Bullion Fringe" to view and sort additional... This slender, yet fine, 2" Bullion fringe is a traditional fringe perfect for use on apparel, edging curtains, cushions, throws and valances. Can be used on the base of loose covers and upholstered furniture. This style available in a variety of colors and sizes. Search "DecoPro Bullion Fringe" to...

home depot decorative trim

This medium weight 2.5" (6.3cm) Bullion fringe is a traditional fringe perfect for edging curtains, cushions, throws and valances. Can be used on the base of loose covers, Pillows and upholstered furniture. This style available in a variety of colors and sizes. Search "DecoPro Bullion Fringe" to view and sort...

Wednesday, December 16, 2020

How-To Home Improvement Building A Wood Fence Beginners DIY Checklist

Wood picket fencing could be placed at the front of the home, for example, connecting to chain link fencing in the back. Not only will this combination fence potentially save installation costs, but it also will reduce the amount of fence that might require repainting. Mixing fencing materials and styles also adds interest to the landscape.

building me a fence building me a home

Follow the instructions on your concrete mix to find out how long it should take to fully dry and set . To gauge how many fence posts you’ll need, divide your fence length by the post spacing. Typically, you’ll want to place a post every 6 to 8 feet. The cost of a split-rail fence is usually between $15 and $25 per linear foot.

Land Leveling

A chain-link fence with a black vinyl coating costs $10 to $34 per foot. To put it another way, it costs 10% more than regular galvanized steel. Nail the cap to the top of each post, ensuring it is level and in the correct position. Paint you fence as desired; you may also choose to coat in a protective treatment to prolong the life of your fence, protecting against insect and weather. The best exterior wood paints, or a fence stain are good options. Learning how to build a fence can save you a lot of money.

building me a fence building me a home

PVC or composite fence costs between $22 and $33 per linear foot on average. The average cost of a 150-foot fence is roughly $3,750. Different types of PVC are often sold in 6′ wide panels, and vinyl posts are installed in 3′ deep concrete holes.

How to Build a Fence in 8 Steps

Swimming pools are a great way to add value and overall appeal to a home. Homeowners who wish to install a swimming pool on their property should first determine whether they wish to build an in-ground or aboveground pool. Generally, aboveground pools are much less expensive.

building me a fence building me a home

Use a trowel to smooth the concrete surface downwards, away from the post. This is so that rainwater will drain away from the wooden post rather than collect by it. If we had been building the fence on top of slabs or a wall, we would have used metal met posts bolted down. For vast expanses, you might want a classic pillar and post fence where wooden stakes are driven into the ground at set intervals.

Chain-Link Privacy Fence

Renting a ground floor apartment is a great option for many people. Discover some of the advantages and disadvantages to renting a first floor apartment. A measuring wheel can be helpful for extensive layouts.

This is dependent on your size as well as the kind and style you select. You can’t make a privacy fence fully made of wrought iron. You have to employ wrought iron fences at 8’ intervals. The range of installation and labor costs is very wide. And so, certain aluminum fence quotes may need an on-site assessment.

In addition, each fence receiver collar costs $50 to $80. Electric fences may also be used to keep horses and animals contained on a ranch as a security measure. The typical cost of a corrugated metal or steel fence is $30 to $50 per linear foot. The cost of raw materials and skilled installation for a standard 150-foot metal fence is from $4,500 to $7,500. With 5-wires, a woven-wire or barbed-wire fence costs little under $2 per linear foot to erect. Wire fence is ideal for home improvement tasks like gardens and pet and animal cages.

building me a fence building me a home

Whatever kind of fence I’m building, I keep the bottom rails about 2-inches above the ground. I’m grateful that I do this in my own yard every time I can effortlessly trim the grass under the fence. Subtract the total lengths of your gates from the total fence footage, then divide this number by the panel length of your desired fence style. Any remaining footage will have to be filled in with a partial panel or pickets. Putting up a fence can require a significant amount of time and work, so it’s good idea to learn some of the basics before you begin a fence project. Get started here with our 8 steps on how to build a fence.

Wooden Privacy Fence

The cost of replacing a fence is nearly the same as the cost of building a new one. It will cost you between $12 and $25 per linear foot on average. You’ll have to pay an extra $3 to $5 for each linear foot to remove your old fence. The cost of removing an existing fence will range from $100 to $1,000, with an average cost of $500. This is something that your contractor may include in their quotation.

building me a fence building me a home

It’s not about scooping up earth, but slicing through the ground. For a fence post it is a shaft in the earth; a small but significant difference.For lots and lots of holes renting a machine may be a better choice. A sub-compact tractor with auger will give you the digging power you need and can also be equipped with forks which are extremely helpful for transporting materials. For each post hole, pour in about 3 to 4 inches of gravel. On top of the gravel, add about 6 to 8 inches of concrete mix. Place your post in the middle of the mixture, then plumb the post with a level to check that it’s properly positioned.

A 150-foot metal fence costs roughly $4,500 to build for the average household. Aluminum and metal fences are less common than wood and vinyl because of their expensive pricing. Aluminum, on the other hand, lasts a long time and requires little maintenance. Once you have all posts in each hole you can begin to fit panels and gravel boards.

building me a fence building me a home

Once you’ve done all of the research, it’s in your best interest to review your fence plans with your neighbors. Make sure you don’t build something that will be an eyesore or obstruct their view in any way. Materials, fasteners, post concrete, and connections are all needed to build a PVC fence. PVC does not rot, deteriorate, or become damaged by insects. It will also not mold or mildew, and it will not need to be repainted. You should anticipate paying anything between $1 and $4 per linear foot for each rail.

So it’s entirely up to you if you want to spend a little more money to save time. That’s what you’ve to know if you want to build a fence for the first time. It will, however, require maintenance, such as sanding and repainting every 24 to 36 months.

building me a fence building me a home

How Much Does It Cost To Build A Fence Explained

Use a trowel to smooth the concrete surface downwards, away from the post. This is so that rainwater will drain away from the wooden post rather than collect by it. If we had been building the fence on top of slabs or a wall, we would have used metal met posts bolted down. For vast expanses, you might want a classic pillar and post fence where wooden stakes are driven into the ground at set intervals.

building me a fence building me a home

Other material options include aluminum, steel, wrought iron, and bamboo. Fit all other posts loosely in their holes, you will concrete them one by one as you fit the panels. If you haven’t a circular saw you can use a hand saw. Reattach batons at intervals with nails at the required width. Project Guide for Garages – The city of Denver, CO, offers a guide to building both attached and detached garages.

Top Guides

Virtually every building inspector I’ve met wants your project to be a success; they’re there to help—and to make sure you don’t build it 6-inches on your neighbor’s property. Keep in mind that using panels instead of pickets will make for a much quicker and simpler building experience. Panels can usually be attached directly to the posts, taking away the hassle of installing rails and attaching pickets one at a time. Many undetectable electric dog fences may be found for $150 to $350 at local pet stores.

building me a fence building me a home

The cost of replacing a fence is nearly the same as the cost of building a new one. It will cost you between $12 and $25 per linear foot on average. You’ll have to pay an extra $3 to $5 for each linear foot to remove your old fence. The cost of removing an existing fence will range from $100 to $1,000, with an average cost of $500. This is something that your contractor may include in their quotation.

Install rails to the posts

Fence construction can be highly regulated; your city, neighborhood or local homeowners association may have specific codes you need to follow. These codes typically govern certain features of your fence, such as its style or height. Customized designs are available for a wrought iron fence.

First, measure twice and predrill where you plan to attach the hinges on your gate section and the gate posts. Finally, install your locking hardware as recommended by the manufacturer. This will help you understand which one you actually need.

More ABBA lyrics

It’s not about scooping up earth, but slicing through the ground. For a fence post it is a shaft in the earth; a small but significant difference.For lots and lots of holes renting a machine may be a better choice. A sub-compact tractor with auger will give you the digging power you need and can also be equipped with forks which are extremely helpful for transporting materials. For each post hole, pour in about 3 to 4 inches of gravel. On top of the gravel, add about 6 to 8 inches of concrete mix. Place your post in the middle of the mixture, then plumb the post with a level to check that it’s properly positioned.

building me a fence building me a home

Homeowners should be prepared with sketches and plans when a permit is required, as well as written permission from any neighbors that will share the fence. Sheds are a great way to increase the amount of storage space that a household has. Sheds are most commonly used to store outdoor equipment, such as lawn mowers and gardening tools.

PVC or composite fence costs between $22 and $33 per linear foot on average. The average cost of a 150-foot fence is roughly $3,750. Different types of PVC are often sold in 6′ wide panels, and vinyl posts are installed in 3′ deep concrete holes.

building me a fence building me a home

Once you are sure that it is straight, concrete the post in and erect your last post along the boundary line in the same way. Using this as a guide, measure out the position needed for each post and mark it by pushing a bamboo cane into what will be the center of each post hole. As an example, standard width fence panels are 1.83m and posts are 100mm wide, in this case the centers of the posts will be 1.93m apart. These canes will serve as a marker to put up each fence post, helping ensure that they are in a line along the boundary and central. Type of WoodAverage CostTropical Hardwoods$6 – $15Redwood$4 – $7Spruce$4 – $6Pine$3 – $7Cedar$4 – $8Pressure-treated pine is the most affordable type of wood fence. The supplies for other woods range from $4 to $15 per linear foot.

Depending on the materials used, fencing materials can cost anywhere from $5 to $35 per linear foot, with most homeowners spending between $8 and $15 per foot. Labor expenses will account for 30 to 50 percent of the total cost of a conventional fence. Installing 100 linear feet of fence takes an average of 15 hours for a skilled fence constructor.

To find out if permits are necessary, contact your local building department. A wrought iron fence can cost anything from $30 and $50 per linear foot. For a 150-foot fence, rates range from $4,500 to $7,500. Materials account for 75 percent of your total expenses on average. The cost of installing a chain-link fence varies between $9 and $30 per linear foot. The majority of them cost between $1,350 and $3,900 on average.

A 150-foot metal fence costs roughly $4,500 to build for the average household. Aluminum and metal fences are less common than wood and vinyl because of their expensive pricing. Aluminum, on the other hand, lasts a long time and requires little maintenance. Once you have all posts in each hole you can begin to fit panels and gravel boards.

Swimming pools are a great way to add value and overall appeal to a home. Homeowners who wish to install a swimming pool on their property should first determine whether they wish to build an in-ground or aboveground pool. Generally, aboveground pools are much less expensive.

Hmong Textile Symbols

Table Of Content Hmong Inspired Borders Collection 2 Cross Stitch Pattern PDF Hmong Keyfobs and keychains, Hmong prints, handmade, gift, blu...